Showing posts with label Hand Sewing. Show all posts

Wednesday, May 5, 2010

Fabric Flower Pins for Mothers Day

I wanted to hold an Activity Day for the girls to do something special for their moms. We normally start our activities off with a short devotional, which my co-leader was in charge of this time around. She chose to share an excerpt from Elder M. Russell Ballard’s April 2010 Conference Talk Mothers & Daughters. The message was perfect for the girls:

“Look to your mother. Learn from her strengths, her courage, and her faithfulness. Listen to her. She may not be a whiz at texting; she may not even have a Facebook page. But when it comes to matters of the heart and the things of the Lord, she has a wealth of knowledge.”

Then, we all took turns saying something that we loved about our mothers.


For our activity, we made these fun Flower Pins for mom. They are super easy and very inexpensive to make.

Materials:
  • Long, narrow piece of fabric, approx. 1.75” X 35” (Cotton fabric is best)
  • Craft Thread
  • Large Needle
  • Felt
  • Large Bar Pin
  • Glue Gun
  • Buttons
Note: I brought a ¼ of a yard of a few different fabrics so the girls had some variety to choose from. Then, I TORE strips approximately 1 ¾ inch in length, so that the fabric had a natural fray to it.
Instructions:

  1. Thread your needle with the craft thread, tying a knot at the end. Begin a running stitch about a ¼” into the length of your fabric strip. Continue stitching the entire length of your fabric, ultimately creating a gather.
  2. Twirl the fabric and manipulate the gather to create a flower shape. Use the needle and thread to sew through all of the layers so that the flower shape stays put. When you achieve your desired look, tie the craft thread into a tight knot on the back and cut the excess craft thread.
  3. Hot glue a button (or two) on the center of the flower. (you can also sew the button onto the center, but I found that it was difficult for the girls to do, given our short time)
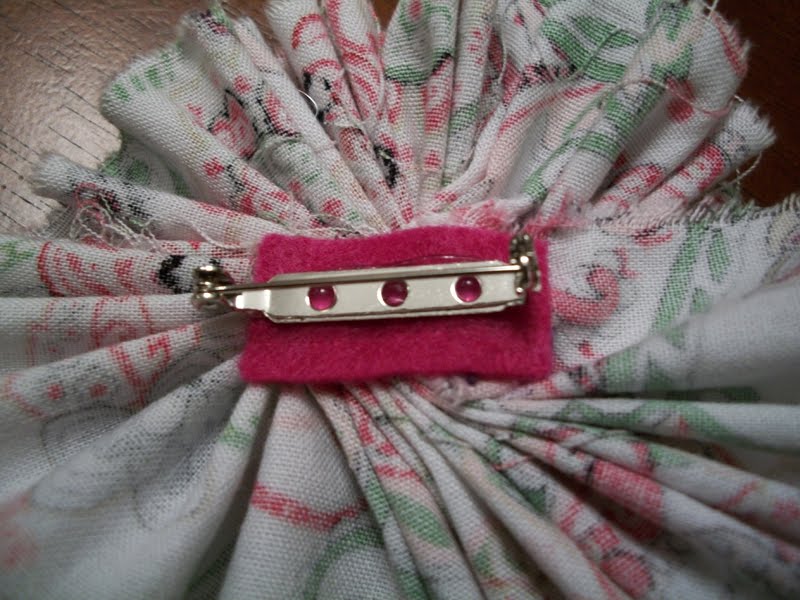
  4. On the back, hot glue a small piece of felt. This will cover up the raw edges and act as a stabilizer for the bar pin. Hot glue the bar pin the felt.


This project was very easy for some of the girls and more difficult for others. It really depended on their exposure to basic sewing. However, each of the girls made beautiful flowers. It was nice having two leaders. I kept the more advanced girls going, while my co-leader stayed and helped the girls that were having more difficulties.

I brought some paper and envelopes so the girls could write letters of appreciation to their mothers. It was a nice activity that gave the girls who finished early something to do.

The girls had a great time with this project and were amazed that they could create this cute flower so easily. We did it in an hour with nine girls. If I had to do it again, I would allow for an extra 15 minutes so they could help with clean-up!

Sunday, February 28, 2010

Activity Day Purse: Pattern & Instructions


As promised, here is my Activity Day Purse Pattern and Instructions. To ensure the proportions are correct, this file should be printed on 11x17 paper.

The purse took us two 2-hour activities to complete. Check out my other posts that document our activities:

Activity Overview
Sewing Part I
Sewing Part II

Click the link below to download the pattern and instructions via Google Docs:
Activity Day Purse Pattern and Instructions

Saturday, January 16, 2010

January Sewing - Part One


Today was our first sewing activity and all-in-all, things went pretty well. My Co-Leader, Chelsea, just started a new job, and was unable to come. So, I called up my BFF Stepahnie, who of course came to my rescuse to help out with the activity. I gave her a quick overview of putting together these simple bags and she was able to jump right in and help the girls.

I sent out invitations ahead of time, asking the girls to bring a 1/2 yard of cotton fabric. I gave them the option of bringing two 1/4 yard pieces, one pattern for the outside of the bag, and another for the inside of the bag. The girls all brought very fun fabric! Some of the girls who only brought 1 pattern, traded with the others to make the fabric combinations even more interesting. I provided:.craft thread (almost like an embroidery floss), needles (with large heads), Felt (for the pocket) Ribbon (for the purse straps), pins and scissors.

For this activity, we focused on cutting and hand-sewing.

We showed the girls how to pin the pattern pieces to their cloth and cut out their fabric pices. Some of the girls were naturals and some had trouble with the whole pinning process--they were either bored or frustrated by it. They only had 3 pieces to cut: the outside & inside bag and the pocket, so the process went by relatively quickly.


We then showed the girls how to hand sew their felt pockets into their purse liners. I simplified the whole pocket process by making them out of felt and having the girls do a simple stitch to apply them. It gives the purses a cute rustic feel. Some of the girls had never sewn before and found it absolutely fascinating! I had no complaints once they got into the actual sewing portion of the activity.


After they sewed on their pockets, we had them pin the inside and outside of the purse to prep for machine sewing, which will be part two of this activity. Then, we helped them cut a length of ribbon for their purse strap (they got to decide how long they wanted their purse to hang).


We organized all of the girls' stuff for next time in paper bags labeled with their names.