Wednesday, May 5, 2010

Fabric Flower Pins for Mothers Day

I wanted to hold an Activity Day for the girls to do something special for their moms. We normally start our activities off with a short devotional, which my co-leader was in charge of this time around. She chose to share an excerpt from Elder M. Russell Ballard’s April 2010 Conference Talk Mothers & Daughters. The message was perfect for the girls:

“Look to your mother. Learn from her strengths, her courage, and her faithfulness. Listen to her. She may not be a whiz at texting; she may not even have a Facebook page. But when it comes to matters of the heart and the things of the Lord, she has a wealth of knowledge.”

Then, we all took turns saying something that we loved about our mothers.


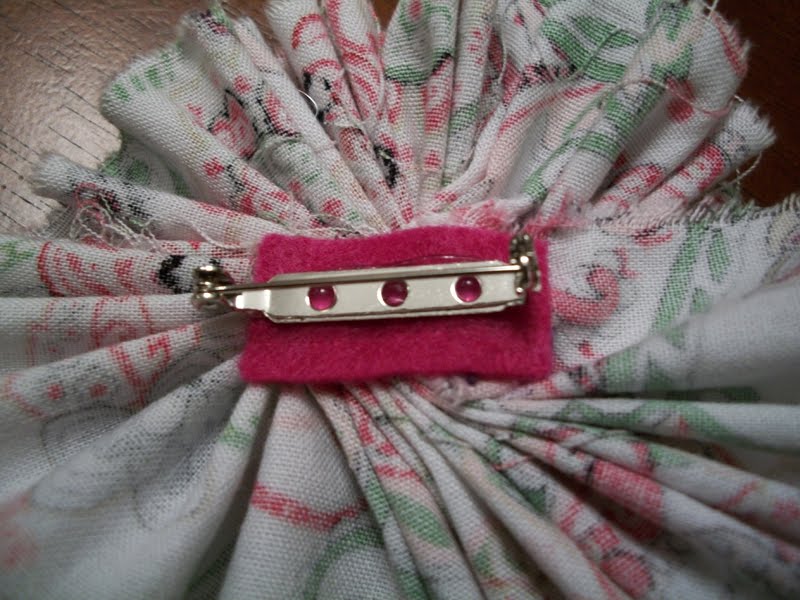
For our activity, we made these fun Flower Pins for mom. They are super easy and very inexpensive to make.

Materials:
  • Long, narrow piece of fabric, approx. 1.75” X 35” (Cotton fabric is best)
  • Craft Thread
  • Large Needle
  • Felt
  • Large Bar Pin
  • Glue Gun
  • Buttons
Note: I brought a ¼ of a yard of a few different fabrics so the girls had some variety to choose from. Then, I TORE strips approximately 1 ¾ inch in length, so that the fabric had a natural fray to it.
Instructions:

  1. Thread your needle with the craft thread, tying a knot at the end. Begin a running stitch about a ¼” into the length of your fabric strip. Continue stitching the entire length of your fabric, ultimately creating a gather.
  2. Twirl the fabric and manipulate the gather to create a flower shape. Use the needle and thread to sew through all of the layers so that the flower shape stays put. When you achieve your desired look, tie the craft thread into a tight knot on the back and cut the excess craft thread.
  3. Hot glue a button (or two) on the center of the flower. (you can also sew the button onto the center, but I found that it was difficult for the girls to do, given our short time)
  4. On the back, hot glue a small piece of felt. This will cover up the raw edges and act as a stabilizer for the bar pin. Hot glue the bar pin the felt.


This project was very easy for some of the girls and more difficult for others. It really depended on their exposure to basic sewing. However, each of the girls made beautiful flowers. It was nice having two leaders. I kept the more advanced girls going, while my co-leader stayed and helped the girls that were having more difficulties.

I brought some paper and envelopes so the girls could write letters of appreciation to their mothers. It was a nice activity that gave the girls who finished early something to do.

The girls had a great time with this project and were amazed that they could create this cute flower so easily. We did it in an hour with nine girls. If I had to do it again, I would allow for an extra 15 minutes so they could help with clean-up!

Wednesday, March 24, 2010

"Bee" a Great Sitter!

Our Activity Day Girls were invited by our Enrichment Committee to babysit for one of our Relief Society Meetings. To prep the older girls for the challenge, I held a "Bee a Great Sitter" night, where we discussed the basics of babysitting, safety tips and fun games that the girls can play with the kids.

I derived most of my ideas from LDS Activity Day Ideas, another Activity Days Blog that I love! I used their content and put my touch on it, giving it a "Bee" theme. All of the content adapted from LDS Activity Day Ideas has been reposted with permission.


To download my "Bee a Great Sitter!" Files via Google Docs, click the links below:

Handouts
Babysitting Tips
Safety First
Important Information Forms
Fun Games
Primary Songs
Things to Add to Your Kit

Labels
Labels for Folders
Labels for Games

Great Finds for this Activity
Home Goods, which is essentially TJ Maxx with all home goods, has fantastic large, reusable shopping bags for under $1 each. I found some on clearance for only 70 each. They have fun, decorative designs on them that the girls loved. They are large enough that the girls can add virtually anything to them including old sheets, dress up clothes, coloring books, etc.

 Wal-Mart had some really fun folders on clearance for 25 cents each in the clearance isle. They were more colorful and durable than the plain ones I was planning on getting! I am always amazed at the cute stationary finds in the clearance section at Wal-Mart.

The Clearance isle at Wal-Mart was also great in finding items for the games that we put together. I found socks for the Sock Guessing game and misc. items for the Sink or Float game. I was amazed how little I spent on the activity!

Preparation
I made each girl a folder with one of each of the hand outs. The only files I printed in color were the Labels for the Folders and the Labels for the Games (which I printed on full-sheeted sticker paper). Black and white copies of the handouts were fine.

I purchased/found materials for the following Games: 
  1. Sock Guessing Game (1 cute sock per girl, found on clearance of course!)
  2. Blowing Cotton Balls (6 cotton balls and a piece of twine for each girl)
  3. Ribbon Matching (Just brought all of the spools of ribbon I had laying around my house)
  4. Sink or Float? (found a number of random items on clearance and around my house. Mine included a piece of sponge, practice golf ball, plastic bracelet, straw, binder clip, plastic spoon and a fishing bob)
Our Activity
For our activity, we all sat in a circle, and I gave each girl a folder. We went through the Babysitting Tips and Safety First handouts together. The girls took turns reading each bullet point, and we discussed each one. I then showed them the "Important Information for Sitters" handout, and told them they could make copies and take them to each babysitting assignment they had.

Then, I briefly touched on the remaining handouts - Things to add to your kit, Primary Songs, and fun Games. Then, we spent the rest of the activity assembling the four games I had prepared. They cut out their labels and assembled all of the items for their kits. They took everything home the great bags that I found. The girls learned a lot and had a lot of fun!

Friday, March 5, 2010

Just One Egg - Easter Activity

For our Easter Activity this year, I am going to share the story "Just One Egg" from the Friend and discuss Easter and Jesus' gift to us. Afterwards, we are going to decorate Easter Eggs.

I will send the girls home with the story to share with their families.

Click the link below to download my PDF version the story "Just One Egg" via Google Docs:
"Just One Egg" Story

Sunday, February 28, 2010

Family Home Evening Lesson & Charts

My Co-Leader and I decided that we could help the girls pass off a number of their Faith in God Goals by helping them prepare Family Home Evening Lessons throughout the year.

To kick this off, I gave a brief lesson on Family Home Evening using the following articles from the Friend. I also printed copies of these articles and sent them home with the girls’ to share at their next Family Home Evening. I put it them all into a folder and labeled it “Family Home Evening Kit #1: My family can be strengthened through Family Home Evening.”

We thought that creating family home evening charts would help the girls get excited about actively participating in Family Home Evening. These FHE charts are easy to make and very flexible. They took us about an hour to complete.

Materials

  • 1 Piece of foam board cut to 12x12”
  • 2 Sheets of coordinating 12x12” scrapbook paper
  • 2 sheets of tag board in coordinating solid colors
  • 28” of ribbon
  • Avery Shipping Labels (optional)
  • Avery Return Labels (optional)
  • Small Clothes Pins
  • Buttons
  • Craft glue
  • Foam Paint Brush
  • Glue gun
  • Pen
  • Scissors and/or Large Round Punches (I used 1” and 1 7/16” rounds) 
Step 1: Chart Background

Combine a little bit of water with a small portion of craft glue. Apply a thin coat to one side of the foam board. Apply one of the sheets of scrapbook paper.  
Step 2: Chart Title

Create a title for your FHE Chart. I simply used “Family Home Evening Assignments” that I printed on a shipping label (you could also hand print your title onto a piece of your solid-colored tag board). Then, I created a boarder out of the coordinating sheet of scrapbook paper and pasted it to the top of my chart.  
Step 3: Task Pins

Cut 1” circles from your solid-colored tag board; enough for a task for each member of your family. Print tasks on Avery Return Labels (or hand print tasks directly on the tag-baord) and trim to fit on the circles. Paste each task label to a clothes pin with craft glue.


Step 4: Name Labels
Cut 1 7/16” circles from your scrapbook paper; one for each member of your family. Cut the same number of 1” circles from the solid-colored tag board. Print your family’s first names on the 1” circles. Center and paste onto the 1 7/8” circles.
Step 5: Ribbon
Cut your ribbon into 2 lengths of 14”. Hot glue the ends to the back of your FHE board, keeping the ribbon taut, in two rows.
Step 6: Finish it Up!
Clip the name labels to the ribbon with your task pins. Add decorative touches to your board by adding buttons and cutting patterns from your scrapbook paper. Make it your own!
These charts look great displayed on a small photo easel.

Vote for my T-Shirt Design on Sugar Doodle!

I recently entered the T-Shirt Design Contest at SugarDoodle.net. Please vote for my Girls Camp Shirt Design "We Are Strong!" You must create a free account or sign in to your account at Sugar Doodle to vote. Thanks for your support! Vote by clicking here.

Activity Day Purse: Pattern & Instructions


As promised, here is my Activity Day Purse Pattern and Instructions. To ensure the proportions are correct, this file should be printed on 11x17 paper.

The purse took us two 2-hour activities to complete. Check out my other posts that document our activities:

Activity Overview
Sewing Part I
Sewing Part II

Click the link below to download the pattern and instructions via Google Docs:
Activity Day Purse Pattern and Instructions

January Sewing - Part 2

The Second part of our sewing project conisted of machine sewing and finishing. I enlisted the help of our Primary President and a mother to help with this project. We had 3 sewing machines and 1 iron. 3 of us taight the girls the basics of machine sewing, one on one, while the 4th helped the girls with the basics of ironing. It all went pretty smoothly. With 7 girls in attendance, it took exactly 2 hours to finish everything up.

Since each of us were only able to help one girl at a time while sewing and pressing, I set up a table with copies of coloring and game pages from the Friend. This gave the girls something to do while they were waiting for their lesson.

Here are a few photos from the activity:


The girls hand finished the top of their purses with the same decorative craft thread that they used for the inside pocket.

When the girls finished their purses, they used craft glue to attach buttons.

A completed purse; waiting for the buttons to dry.