
Hi everyone:
I have been using Google Docs as my file sharing source (since it's totally free). Someone just commented that they were having trouble printing and downloading my files from Google Docs. I'd love to get your feedback... let me know if Google Docs does the job or if you've had issues as well by leaving a comment below
Also, if you have any suggestions for file sharing websites, I would be very grateful!
Thanks!
Wendy
Wednesday, November 3, 2010
Saturday, October 30, 2010
Family History

I was a little worried about this activity at first, because I thought the girls would be uninterested or even bored with the subject as a whole, but I was definitely proven wrong. This activity was the most spiritual activity we have ever had. The girls had a great time trying to pronounce the names of their grandparents and great grandparents, discovering who they were named after and realizing how long ago their some of their great grandparents were born! I was so impressed that some of the girls even knew stories about some of their family members.
Prior to the activity, I emailed this worksheet to the girls’ parents, encouraging them to fill in as much as they could, and to send the worksheet to the activity with their daughter.
Family History Worksheet
We started our activity with a brief devotional from this 2005 article from the Friend:
Come Listen to a Prophet’s Voice: Your Fascinating History By President James E. Faust
We discussed how family history and temple work go hand in hand, and how we can be families forever.

Family History Booklet *
* This booklet is best printed on two 11x17 pages, double sided, folded and saddle-stitched (stapled) at the center. It will look jumbled and a bit confusing when you download it, but it will look perfect when printed double-sided and folded.
- First, have the girls write their name on name plate on the front page
- Second, have them fill out their family tree with full names only. The numbers on the family tree correspond with the numbers on the worksheet, so the girls will know exactly where to put each name.
- Third, have the girls fill out the more detailed information on the following pages (birthdates and ordinances completed). There is also room for them to write down their testimony, what they love about their parents, and what they love about their grandparents.
- Challenge the girls to learn more about their great grandparents, write down a few stories on paper, and add it to their booklets.
Blank Nameplates
I hope that you will love this activity as much as we did!
Tuesday, September 21, 2010
My Modest Fashion Collection

This was an activity that I did in May, Just as the weather was getting warmer to remind the girls to dress modestly, but really it can be done any time of year. For this activity, download My Modest Fashion Collection file via Google Docs:
My Modest Fashion Collection
Materials Needed for Activity:
- A copy of “My Modest Fashion Collection” for each girl (4 Pages total)
- Tracing Paper
- Scissors
- Crayons, pens
- Yarn
- Scrap Fabric, ribbon, buttons
- Glue
- Wiggly Eyes (optional)

Next, start designing modest outfits! The Collection has 3 different looks: Swimming Suit, Casual wear and Sunday best.
The tracing paper allows the girls to draw outfits on top of the paper “models,” and then use them as patterns for cutting their fabric. They used small pieces of ribbon to create accessories like belts.
The tracing paper allows the girls to draw outfits on top of the paper “models,” and then use them as patterns for cutting their fabric. They used small pieces of ribbon to create accessories like belts.
- We used yarn to create fun hairstyles. My girls were so creative and came up with pony tails and braids!
- Use glue to adhere the outfits and hair to the models. I used Aleeene's Orginal All-Purpose Tacky Glue
- Many of the girls used crayons to color the skin and give their paper models faces.
Note: This activity actually took a bit longer than I expected. The girls were only able to finish 1 or two outfits. I sent my girls home with extra fabric scaps to finish their outfits.
Sunday, September 19, 2010
Journals

I decided I really couldn’t beat this deal, so I stocked up and decided that we would have an Activity Day on Journals. I based our craft on this demonstration on eHow.com.
I purchased some girly scrapbook paper at hobby lobby when it was 50% off. Then, I gathered up all of my extra stickers, buttons, and markers. I also made name labels to for the girls to add to the front of their journals (download the PDF doc below).
We started the Activity with a 15 minute discussion/devotional about journals. We asked the girls if any of them kept a journal, why we should keep a journal and things they can write in their journals. We also shared a couple of personal stories about blessing from keeping a journal. My co-leader talked to the girls about Joseph Smith and how he recorded his history. She read verses 11 – 19 from Joseph Smith History, and then bore her testimony about how she was so happy that Joseph Smith wrote those things down so that she could have a testimony of the true church.
Then we got to work on our journals! Here are a few pictures how ours turned out.


To download my Journal Labels via Google Docs, click the link below. These should be printed on Avery 5164 Labels.
Journal Labels
Happy Birthday, Girls!
I have not been very good about keeping up with birthdays this year, so to kick off the beginning of the school year, I decided to have a big birthday party to celebrate all of the girls. The story from the August 2010 Friend “Birthday Standards” served as the theme for this fun activity.
First, I mailed Invitations to each of the girls will the following text:
I gave each of the girls a birthday crown (Purchased at hobby Lobby $2.49 for 6) to wear to the party. I told them that the crown should remind them that they are daughters of our heavenly father and should never be afraid to stand up for what is right, no matter the occasion. Then, I brought them into our activity room where I had the party all set up.
Piñata Craft
Like I mentioned before, I used the story from the friend as my theme. I wanted to make sure we had a piñata, so I came up with this fun and mess-free version that would allow the girls to take home their own personal piñata.
Supplies:


Other details at our Party:
First, I mailed Invitations to each of the girls will the following text:
You’re Invited to an Activity Days Birthday Party!
Join us at the church on from
We will be celebrating someone very special!
Please RSVP
I greeted each of the girls at the door and we gathered in the foyer. When all of the girls arrived, I read the story Birthday Standards.
I gave each of the girls a birthday crown (Purchased at hobby Lobby $2.49 for 6) to wear to the party. I told them that the crown should remind them that they are daughters of our heavenly father and should never be afraid to stand up for what is right, no matter the occasion. Then, I brought them into our activity room where I had the party all set up.
Piñata Craft
Like I mentioned before, I used the story from the friend as my theme. I wanted to make sure we had a piñata, so I came up with this fun and mess-free version that would allow the girls to take home their own personal piñata.
Supplies:
- 8 oz Styrofoam cups (purchased at grocery store $.99 for 125)
- Masking Tape
- Individually-wrapped candies (I purchased a HUGE value pack with Nerds, Laffy Taffy, Gobstoppers & Sweat tarts for $8.99 and had a ton left over)
- Crepe-paper streamers, assortment of colors (purchased at Hobby Lobby for $.99 a roll)
- Elmer’s Glue
- Ribbon
- Pen
Directions:
- Stuff a Styrofoam cup full of candy. This is the bottom of your piñata.
- With a second Styrofoam cup, use a pen to poke two holes near the bottom of the cup. Take a 15” length of ribbon and thread so that both ends of the ribbon are inside the cup. Tie a secure square knot inside the cup. This is the top of your piñata
- Place the openings of the top and bottom piñata together. Use masking tape to secure them together
- Take a small length of a crepe-paper streamer, just enough to wrap around the piñata once. Cut slits about ¾ of the way to the top. Place a small line of glue along the top and wrap around the piñata. Continue with this step until the entire piñata is decorated. This can be done with as little as 6 rows, but you can add as many as you want to make it fuller.
- Ruffle up each of the rows of crepe-paper to make the piñata look fuller.
- To finish off the top, take a 4” length of crepe-paper streamer and fold it in half. Cut slits almost to the fold. Crinkle the folded end together and glue to the top of your piñata. Make at least 4 for the best coverage.


Your final pinata should look something like this:

**Tip: I completed steps 1-3 at home so the girls would be surprised at the treats that come out. Save a lot of time and let the girls complete the fun part!
Here are the pinatas that the girls put together. They had so much fun!


Other details at our Party:
- Gift for each of the Girls: I took a cue from the story and purchased stationary notecards for each of the girls and wrapped each set with a purple ribbon. I was able to pull this off relatively inexpensively by purchasing a package of 4 sets of cards from Hobby Lobby and separating out the sets. With a 40% off coupon, I paid $4.19 for this set making each gift a little over $1.00/girl.
- Cupcakes
- Music (think children’s song book or other appropriate music)

Wednesday, May 5, 2010
Fabric Flower Pins for Mothers Day
I wanted to hold an Activity Day for the girls to do something special for their moms. We normally start our activities off with a short devotional, which my co-leader was in charge of this time around. She chose to share an excerpt from Elder M. Russell Ballard’s April 2010 Conference Talk Mothers & Daughters. The message was perfect for the girls:
Then, we all took turns saying something that we loved about our mothers.

Materials:
Instructions:
This project was very easy for some of the girls and more difficult for others. It really depended on their exposure to basic sewing. However, each of the girls made beautiful flowers. It was nice having two leaders. I kept the more advanced girls going, while my co-leader stayed and helped the girls that were having more difficulties.
I brought some paper and envelopes so the girls could write letters of appreciation to their mothers. It was a nice activity that gave the girls who finished early something to do.
The girls had a great time with this project and were amazed that they could create this cute flower so easily. We did it in an hour with nine girls. If I had to do it again, I would allow for an extra 15 minutes so they could help with clean-up!
“Look to your mother. Learn from her strengths, her courage, and her faithfulness. Listen to her. She may not be a whiz at texting; she may not even have a Facebook page. But when it comes to matters of the heart and the things of the Lord, she has a wealth of knowledge.”
Then, we all took turns saying something that we loved about our mothers.

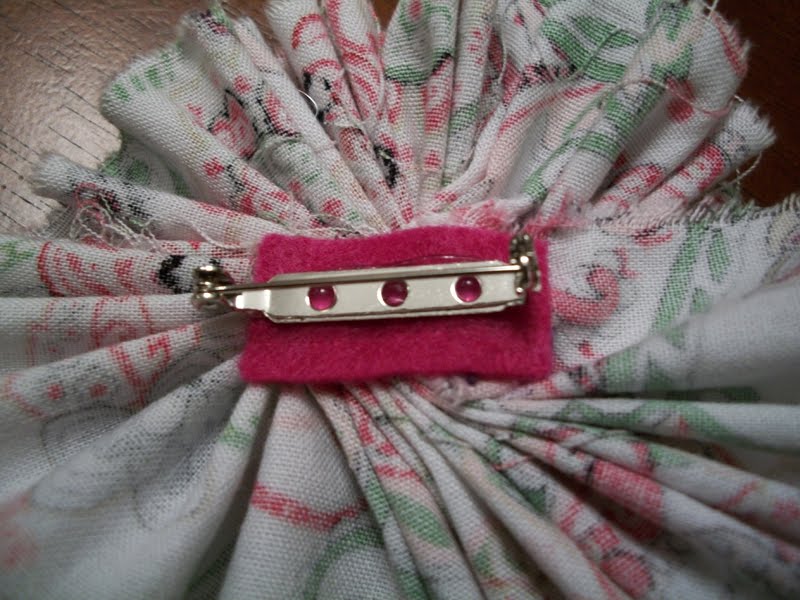
For our activity, we made these fun Flower Pins for mom. They are super easy and very inexpensive to make.
Materials:
- Long, narrow piece of fabric, approx. 1.75” X 35” (Cotton fabric is best)
- Craft Thread
- Large Needle
- Felt
- Large Bar Pin
- Glue Gun
- Buttons
Instructions:
- Thread your needle with the craft thread, tying a knot at the end. Begin a running stitch about a ¼” into the length of your fabric strip. Continue stitching the entire length of your fabric, ultimately creating a gather.
- Twirl the fabric and manipulate the gather to create a flower shape. Use the needle and thread to sew through all of the layers so that the flower shape stays put. When you achieve your desired look, tie the craft thread into a tight knot on the back and cut the excess craft thread.
- Hot glue a button (or two) on the center of the flower. (you can also sew the button onto the center, but I found that it was difficult for the girls to do, given our short time)
- On the back, hot glue a small piece of felt. This will cover up the raw edges and act as a stabilizer for the bar pin. Hot glue the bar pin the felt.


I brought some paper and envelopes so the girls could write letters of appreciation to their mothers. It was a nice activity that gave the girls who finished early something to do.
The girls had a great time with this project and were amazed that they could create this cute flower so easily. We did it in an hour with nine girls. If I had to do it again, I would allow for an extra 15 minutes so they could help with clean-up!
Wednesday, March 24, 2010
"Bee" a Great Sitter!
Our Activity Day Girls were invited by our Enrichment Committee to babysit for one of our Relief Society Meetings. To prep the older girls for the challenge, I held a "Bee a Great Sitter" night, where we discussed the basics of babysitting, safety tips and fun games that the girls can play with the kids.

To download my "Bee a Great Sitter!" Files via Google Docs, click the links below:
Handouts
Babysitting Tips
Safety First
Important Information Forms
Fun Games
Primary Songs
Things to Add to Your Kit
Labels for Games
 Home Goods, which is essentially TJ Maxx with all home goods, has fantastic large, reusable shopping bags for under $1 each. I found some on clearance for only 70 each. They have fun, decorative designs on them that the girls loved. They are large enough that the girls can add virtually anything to them including old sheets, dress up clothes, coloring books, etc.
The Clearance isle at Wal-Mart was also great in finding items for the games that we put together. I found socks for the Sock Guessing game and misc. items for the Sink or Float game. I was amazed how little I spent on the activity!
Preparation
I made each girl a folder with one of each of the hand outs. The only files I printed in color were the Labels for the Folders and the Labels for the Games (which I printed on full-sheeted sticker paper). Black and white copies of the handouts were fine.
 For our activity, we all sat in a circle, and I gave each girl a folder. We went through the Babysitting Tips and Safety First handouts together. The girls took turns reading each bullet point, and we discussed each one. I then showed them the "Important Information for Sitters" handout, and told them they could make copies and take them to each babysitting assignment they had.

 Then, I briefly touched on the remaining handouts - Things to add to your kit, Primary Songs, and fun Games. Then, we spent the rest of the activity assembling the four games I had prepared. They cut out their labels and assembled all of the items for their kits. They took everything home the great bags that I found. The girls learned a lot and had a lot of fun!
I derived most of my ideas from LDS Activity Day Ideas, another Activity Days Blog that I love! I used their content and put my touch on it, giving it a "Bee" theme. All of the content adapted from LDS Activity Day Ideas has been reposted with permission.

To download my "Bee a Great Sitter!" Files via Google Docs, click the links below:
Handouts
Babysitting Tips
Safety First
Important Information Forms
Fun Games
Primary Songs
Things to Add to Your Kit
Labels
Labels for FoldersLabels for Games
Great Finds for this Activity

Wal-Mart had some really fun folders on clearance for 25 cents each in the clearance isle. They were more colorful and durable than the plain ones I was planning on getting! I am always amazed at the cute stationary finds in the clearance section at Wal-Mart.
The Clearance isle at Wal-Mart was also great in finding items for the games that we put together. I found socks for the Sock Guessing game and misc. items for the Sink or Float game. I was amazed how little I spent on the activity!
Preparation
I made each girl a folder with one of each of the hand outs. The only files I printed in color were the Labels for the Folders and the Labels for the Games (which I printed on full-sheeted sticker paper). Black and white copies of the handouts were fine.
I purchased/found materials for the following Games:
- Sock Guessing Game (1 cute sock per girl, found on clearance of course!)
- Blowing Cotton Balls (6 cotton balls and a piece of twine for each girl)
- Ribbon Matching (Just brought all of the spools of ribbon I had laying around my house)
- Sink or Float? (found a number of random items on clearance and around my house. Mine included a piece of sponge, practice golf ball, plastic bracelet, straw, binder clip, plastic spoon and a fishing bob)


Friday, March 5, 2010
Just One Egg - Easter Activity

I will send the girls home with the story to share with their families.
Click the link below to download my PDF version the story "Just One Egg" via Google Docs:
"Just One Egg" Story
Sunday, February 28, 2010
Family Home Evening Lesson & Charts
My Co-Leader and I decided that we could help the girls pass off a number of their Faith in God Goals by helping them prepare Family Home Evening Lessons throughout the year.
To kick this off, I gave a brief lesson on Family Home Evening using the following articles from the Friend. I also printed copies of these articles and sent them home with the girls’ to share at their next Family Home Evening. I put it them all into a folder and labeled it “Family Home Evening Kit #1: My family can be strengthened through Family Home Evening.”


 Step 1: Chart Background

 Step 2: Chart Title

 Step 3: Task Pins
 Step 4: Name Labels
Cut 1 7/16” circles from your scrapbook paper; one for each member of your family. Cut the same number of 1” circles from the solid-colored tag board. Print your family’s first names on the 1” circles. Center and paste onto the 1 7/8” circles.

 Step 5: Ribbon
Cut your ribbon into 2 lengths of 14”. Hot glue the ends to the back of your FHE board, keeping the ribbon taut, in two rows.

 Step 6: Finish it Up!
Clip the name labels to the ribbon with your task pins. Add decorative touches to your board by adding buttons and cutting patterns from your scrapbook paper. Make it your own!

 These charts look great displayed on a small photo easel.
To kick this off, I gave a brief lesson on Family Home Evening using the following articles from the Friend. I also printed copies of these articles and sent them home with the girls’ to share at their next Family Home Evening. I put it them all into a folder and labeled it “Family Home Evening Kit #1: My family can be strengthened through Family Home Evening.”
- Lesson: Following a Prophet
- Activity: Our Family Will be Strong
- Song: Hymn 300 “Families Can be Together Forever”
- Treat: Sweethearts
We thought that creating family home evening charts would help the girls get excited about actively participating in Family Home Evening. These FHE charts are easy to make and very flexible. They took us about an hour to complete.

Materials
- 1 Piece of foam board cut to 12x12”
- 2 Sheets of coordinating 12x12” scrapbook paper
- 2 sheets of tag board in coordinating solid colors
- 28” of ribbon
- Avery Shipping Labels (optional)
- Avery Return Labels (optional)
- Small Clothes Pins
- Buttons
- Craft glue
- Foam Paint Brush
- Glue gun
- Pen
- Scissors and/or Large Round Punches (I used 1” and 1 7/16” rounds)


Combine a little bit of water with a small portion of craft glue. Apply a thin coat to one side of the foam board. Apply one of the sheets of scrapbook paper.


Create a title for your FHE Chart. I simply used “Family Home Evening Assignments” that I printed on a shipping label (you could also hand print your title onto a piece of your solid-colored tag board). Then, I created a boarder out of the coordinating sheet of scrapbook paper and pasted it to the top of my chart.


Cut 1” circles from your solid-colored tag board; enough for a task for each member of your family. Print tasks on Avery Return Labels (or hand print tasks directly on the tag-baord) and trim to fit on the circles. Paste each task label to a clothes pin with craft glue.

Cut 1 7/16” circles from your scrapbook paper; one for each member of your family. Cut the same number of 1” circles from the solid-colored tag board. Print your family’s first names on the 1” circles. Center and paste onto the 1 7/8” circles.


Cut your ribbon into 2 lengths of 14”. Hot glue the ends to the back of your FHE board, keeping the ribbon taut, in two rows.


Clip the name labels to the ribbon with your task pins. Add decorative touches to your board by adding buttons and cutting patterns from your scrapbook paper. Make it your own!


Vote for my T-Shirt Design on Sugar Doodle!

Activity Day Purse: Pattern & Instructions

The purse took us two 2-hour activities to complete. Check out my other posts that document our activities:
Activity Overview
Sewing Part I
Sewing Part II
Click the link below to download the pattern and instructions via Google Docs:
Activity Day Purse Pattern and Instructions
January Sewing - Part 2
The Second part of our sewing project conisted of machine sewing and finishing. I enlisted the help of our Primary President and a mother to help with this project. We had 3 sewing machines and 1 iron. 3 of us taight the girls the basics of machine sewing, one on one, while the 4th helped the girls with the basics of ironing. It all went pretty smoothly. With 7 girls in attendance, it took exactly 2 hours to finish everything up.
Since each of us were only able to help one girl at a time while sewing and pressing, I set up a table with copies of coloring and game pages from the Friend. This gave the girls something to do while they were waiting for their lesson.
Here are a few photos from the activity:

The girls hand finished the top of their purses with the same decorative craft thread that they used for the inside pocket.
 When the girls finished their purses, they used craft glue to attach buttons.
 A completed purse; waiting for the buttons to dry.
Since each of us were only able to help one girl at a time while sewing and pressing, I set up a table with copies of coloring and game pages from the Friend. This gave the girls something to do while they were waiting for their lesson.
Here are a few photos from the activity:

The girls hand finished the top of their purses with the same decorative craft thread that they used for the inside pocket.


Subscribe to:
Posts (Atom)


